Saturday, March 26, 2011

Scrappy Mom's Challenge-Smiley Cards

Hi everyone! I'm back with another Scrappy Mom's Tuesday challenge. The challenge is to use the Smiley Card cartridge. Here's my card...
I used the sewing machine to give my card a border. I used a
background and texture stamp from Close To My Heart for the
sand. I hand cut the sand.The *Feeling Crabby* sentiment is 

from the Scrappy Moms Stamp set Furry Friends a fav of mine :) 

Cuts:
  • Smiley Card cartridge 
  • 2 3/4"  Crab
  • Create a Critter cartridge pg. 41
  • 1" Starfish (I used my Gypsy to hide details)
  • Standard A2 sized card-craft-PaperTrey Ink
I hope you all have a relaxing weekend. :)

Saturday, March 19, 2011

Ruff Ruff

Hi everyone! Sorry I've been gone--Sammy has RSV(basically flu for babies) and she only wants me to hold her when she doesn't feel good. We even spent one night at the hospital because she was having trouble breathing and had such a high fever. Good news--she's feeling much better. (Phew)

I spent some time in the *creation station* last night and today I have a couple more basic cards to share. I'm still thinking of cards that will be easy for my sister to learn some techniques.
I love this little dog. This card would be a great thank you
for a pet sitter or a *just because* card for a dog lover :) I added
a basic stitch with my sewing machine around the edge and some light color 

was added to the edge with some light brown chalk ink. The little 
dog dish has the face as part of the cut, but if you have a Gypsy you
could *hide* the face. You might need to add the eyes in with a black

pen if they don't cut very well--pretty small.
On this little guy I rounded the corners with my Corner Chomper
and I embossed the background for a little texture with the 

Spots and Dots folder and Cuttlebug. Same dog, same size,
 just different techniques. Both cards will get your feet wet 
as far trying these fun techniques.The cards are basic,
 but if your like me, sometimes it's more about getting 
some creative time, and getting a card done and sent:)

Cuts:
  • Create a Critter cartridge pg.34
  • 3"  terrier and all layers
  • 1 1/2"  phrase RUFF RUFF
  • 3/4" dog bowl 
  • Standard A2 sized card-craft-PaperTrey Ink

Monday, March 14, 2011

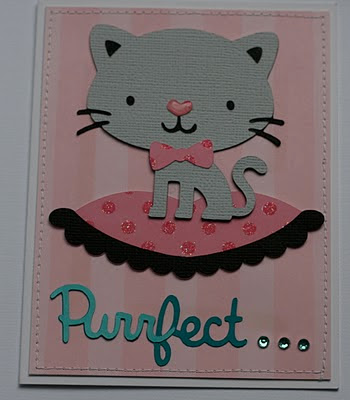
Purrfect

Hi everyone! Things are still busy here. Megan and Sammy both came down with colds this past weekend. Sammy has a fever and a bad cough. I guess it's still that time of year. Hopefully everyone is better by the weekend so we can go visit my sister and her family.

This week I am going to be making cards with the Create a Critter cartridge. I bought my sister a Cricut for Christmas and now she just needs some basic card ideas to get started. The kitty is so cute, perfect for a thank you card or just because.
The pink background paper is from Close To My
Heart. I love the color combination of pink and teal.
I used the same glittered pink dot paper for the bed, bow,
and nose. I used glossy accents on the nose. A little stitching
with the sewing machine around the edge. A bonus about the
CAC cartridge is that is has great cuttable sentiments. 

Cuts:
  • Create a Critter cartridge pg.38
  • 2 3/4"  kitty and all layers
  • 1 3/4" cushion
  • 1" phrase Purrfect 
  • Standard A2 sized card
I hope you all enjoy your week! I should be back tomorrow with a new card.

Friday, March 4, 2011

Country Life

Hi everyone! It's kinda been a long week. Sammy is getting her two year molars and her sleep schedule is way off. On Tuesday she was up at 11:30 PM and didn't go back to sleep until 4:30 AM. I still had to get the big girls up to get ready for school at 5:00 AM. When Sam isn't feeling well all of my craft plans move to the back burner :( I do feel really bad for her--I can only imagine how uncomfortable she is-poor baby!

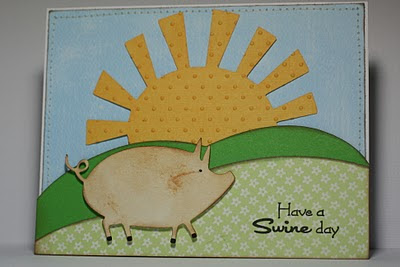
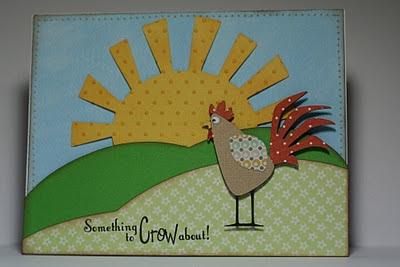
On different note--my friend Jill came over last weekend and we did get to craft some cuteness. We started a card set with the Country Life cartridge, and I finally had a chance to finish the cards up today.
Standard A2 sized cards.
I cut the countryside at 3 3/4", so it would fill in the card front
and give room to stamp my sentiment. I centered the sun and
then I just trimmed the excess off with my paper trimmer. 
I chose to cut just three of the countryside layers-the handbook
gives the option of five layers, but I felt like five layers was kinda
*thick* and there really wouldn't be a big enough area for my
stamping. I dirtied up my little pig with Tim Holtz walnut ink and

added his eye with my Micron black pen.
I added some stitching and creamy brown Chalk ink to the edges
for a little depth. I popped up all of the animals with pop dots.
These little lambs with their black faces are so cute! Now the
handbook does have a cut layer for the face, but honestly the faces
didn't cut very well at this size, and they looked cuter left black.
I went back and added the horse's eyes with my black Micron pen. I
used the Swiss Dots embossing folder with my Cuttlebug for a
little texture on the sun.

Cuts:
  • Country Life cartridge pg.72
  • 3 3/4"  countryside and three layers 
  • CL cartridge pg.41
  • 2" lambs and layers 
  • CL cartridge pg.46
  • 2 1/4" horse
  • From My Kitchen cartridge pg.74
  • 1 3/4"  pig and layers 
  • FMK cartridge pg.77
  • 1 3/4" rooster and layers
The two stamps sets I used are both by Scrappy Moms Stamps--*Furry Friends* and *The Charmed Life*. I hope you all enjoy the cards and have a great weekend :) 

I'm really open to any helpful tips on dealing with teething...we need sleep!